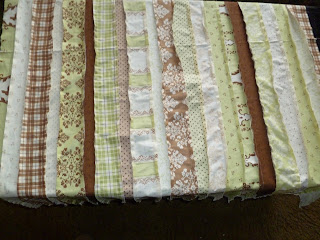
through pinterest.com i found this super awesome quilt. my only problem with it is that it calls for 2 jelly rolls. with a single jelly roll costing about $35 there was no way i would be able to make this quilt happen. so i finagled and came up with a plan B: a quilt that looks almost exactly like this, but only uses 1 jelly roll.
Cheaper Jelly Roll quilt:
1 Moda Jelly Roll
2 yards cotton batting
2 yards muslin/cotton of choice (goes under the jelly roll strips, above the batting)
2 yards flannel
lots of thread, bias for binding the edges
start with your jelly roll, and arrange about ten of the strips in an order you like. i did no pattern, just sort of random. and doing only ten at a time freed up work space, and chances of my dog getting the fabric all dirty. i went from selvage to selvage, trimming will take places later.
pin the edges of two strips WRONG SIDES together so that when they are sewn you will be adding two frontward facing pieces and frayed edges will be on the Right Side
repeat until you have used up as much of the jelly roll as you want/can. i have about six strips left over because they are all greens.
this is my quilt, halfway done. the next steps i haven't even done myself yet, but they will be SO easy.
layer the strips sewn together, the muslin, batting, and flannel. the strips sewn together and flannel should both be Right Sides outward. pin all the layers together using safety pins or straight pins. (i prefer safety pins because this will take me a few days to complete and i want to be confident that my quilt will not shift) sew a straight line down each jelly roll strip to quilt all four layers together. be sure that all the layers are straight together, when finished, this will be the length and width of your quilt so you want to be sure that you don't have to cut off too much to be sure that the layers are even.
bind the edges using bias or whatever you prefer. throw in the washer, snip off loose threads, dry. and love that you made your very first real quilt!


No comments:
Post a Comment